
Recent How To and Help Articles


%20(3).png)
Printer help and fixes
Printer Help and Fixes
Laptop Help and Fixes


.jpg)
This tutorial provides steps to troubleshoot a printer that appears as “offline” in your Windows or macOS settings. This issue commonly arises when the printer is either turned off or not correctly connected to the network. If you’ve confirmed that the printer is powered on and ready to print, the problem may be associated with the printer service on your computer.
Method 1 – Troubleshooting in Windows

Ensure your printer is powered on. Before proceeding with any troubleshooting steps, verify that your printer is switched on and connected to a power outlet.
If the printer is in Sleep mode, you might need to press a button on it to wake it up.
Restart your printer. If your printer was already powered on but appears offline, a simple restart may resolve the issue. Follow these steps:
-
Turn off and unplug your printer for 30 seconds. This allows your printer to reboot and re-establish connection with your computer.
-
Plug in and turn on your printer. After a brief moment, check to see if the printer is still listed as “offline.”

Ensure the printer is connected to the same network as your computer. If your printer connects via Wi-Fi or Ethernet, a network issue could cause it to appear offline.
To check your printer’s network settings, you typically need to navigate its internal menus using the buttons on the printer itself.
If you’re using a USB cable, ensure it’s securely plugged in. Consider trying a different USB cable to rule out a faulty connection.
Additionally, ensure there is paper in the printer tray. Some printers may show as offline if there’s no paper available for printing.
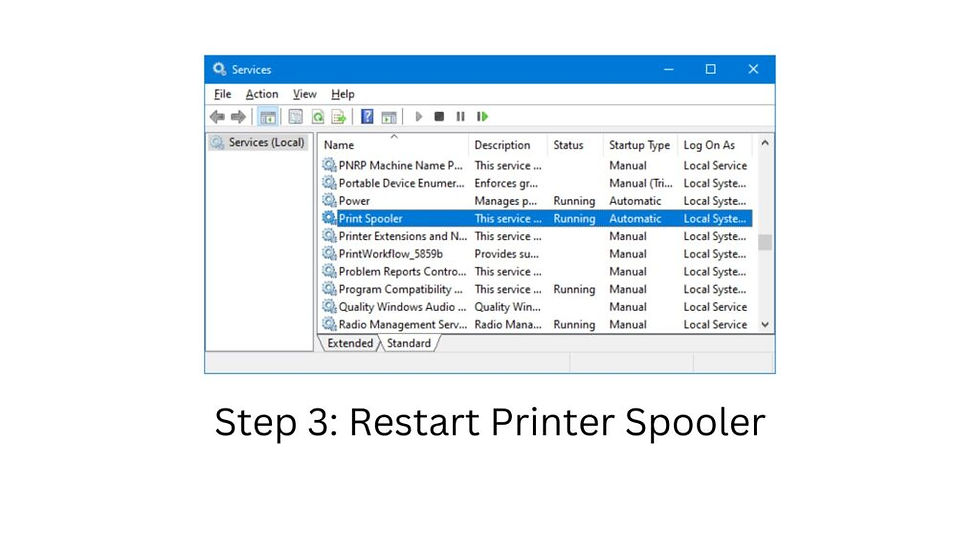
To restart the print spooler, follow these steps:
-
Press the ⊞ Win key and S simultaneously to open the search bar, then type “services.”
-
Click on “Services” in the search results.
-
Scroll down the list and right-click on the “Print Spooler” service.
-
Select “Restart.” This action will refresh the printer dialog, allowing your computer to rediscover the printer.
-
Wait a few minutes and check if your printer is now detected online.
It may take a moment for the printer spooler service to restart, so please be patient.
To troubleshoot further:
-
Click on the Windows Start menu and select “Settings” (Windows Settings).
-
Select “Devices” from the Settings menu.
-
Click on “Printers & scanners.” Here, you’ll see your printer listed along with other connected devices.
-
Clear the print queue by:
-
Selecting your printer and choosing “Open Queue.”
-
Selecting a document in the queue.
-
Clicking “Cancel” under “Document.”
-
Repeat until the queue is empty.
-
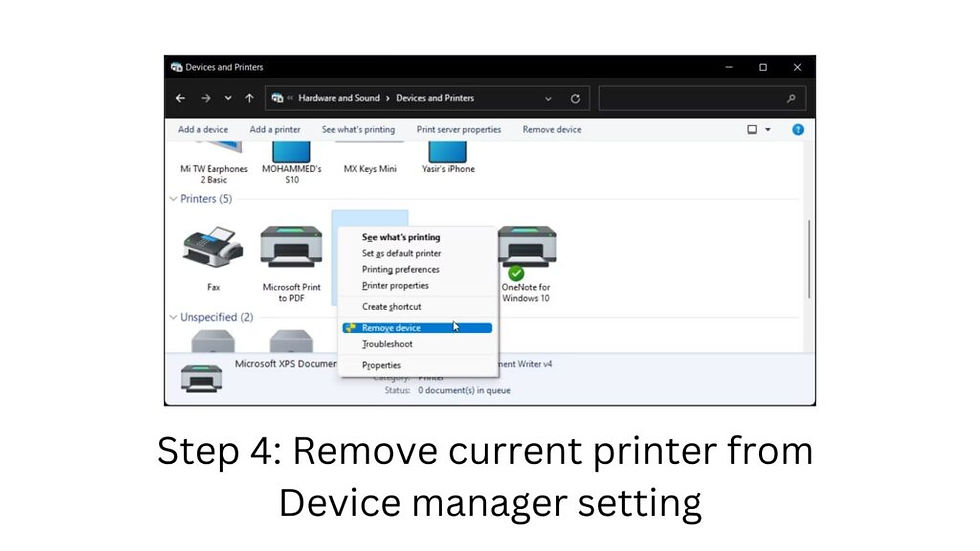
Check if the printer is functioning. If the issue persists, proceed with the next steps.
-
Click on the printer’s name and select “Remove device.” This will uninstall the printer’s drivers.

Finally, click “Add a device or printer” at the top of the “Printers & scanners” menu to re-add your printer.

Follow the on-screen instructions to re-add your printer. Once the printer is re-added, check to see if it’s showing up as “online.”
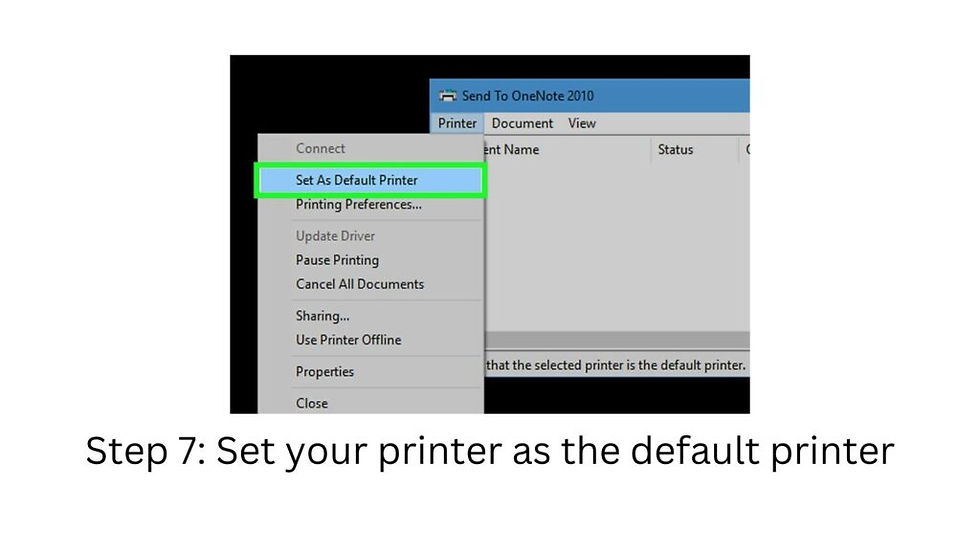
To set your printer as the default printer:
-
Navigate to the “Printers & scanners” menu.
-
Click on the printer you wish to set as the default.
-
Select “Open queue.”
-
In the menu for your printer’s queue, select “Set As Default Printer.” This option appears in the Printer menu within the window displaying the printer queue.
Method 2 – Troubleshooting on Mac

-
Click on the Apple menu. You’ll find it located in the top-left corner of your screen.
-
From the dropdown menu, select “System Preferences.”

Click on “Printers & Scanners” or “Print & Scan” to open the menu listing all printers connected to your Mac in a new window.
From there, select the printer you wish to connect.
Next, right-click anywhere inside the Printers window. This action will open a small pop-up list with additional options for the printer listed in the window.
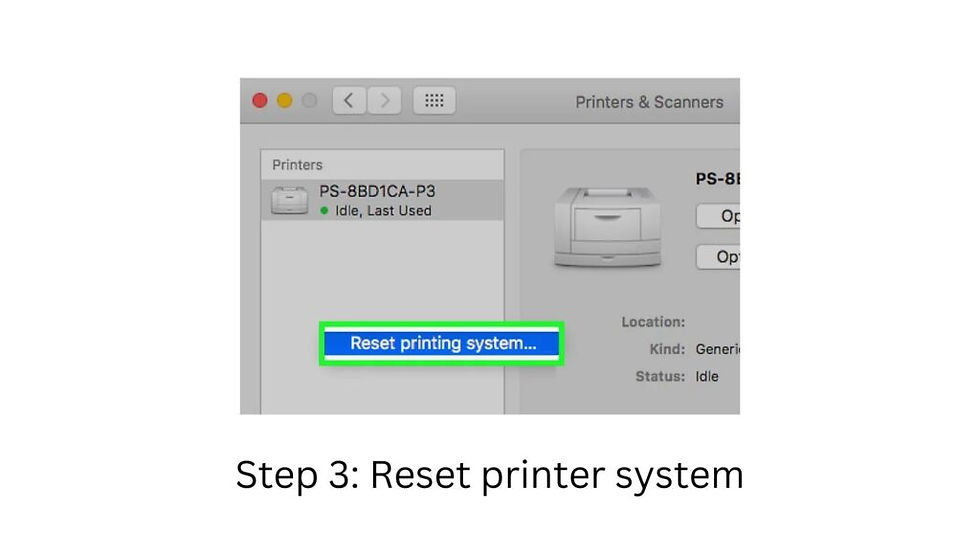
Select “Reset printing system” from the menu.
This action will prompt another window to open, asking you to confirm the reset of the printing system.

Click on “Reset” in the confirmation window. This action will prompt another window to appear, requesting the Administrator name and password.
Please note that resetting the printing system will delete all printers and scanners connected to your Mac. After restarting your system, you’ll need to re-add any devices you still wish to use.

Enter the Administrator name and password, then click “OK.” This will initiate the reset process for your Mac’s printing system. Once completed, the printing system will be reset to its default settings.

After resetting the printing system, return to the “Printers & Scanners” page. You’ll need to re-add the printer to your Mac.

Click “Add a Device.” This action opens a dialog that scans for your printer to detect it automatically. Before proceeding, ensure your printer is turned on and ready to connect.
Select your printer from the list and click “Add.” This will re-establish the connection between your printer and your Mac’s wireless network. Your printer should now appear online if there are no mechanical issues.
If you haven’t already, reconnect any other devices in the same manner to add them back to your Mac